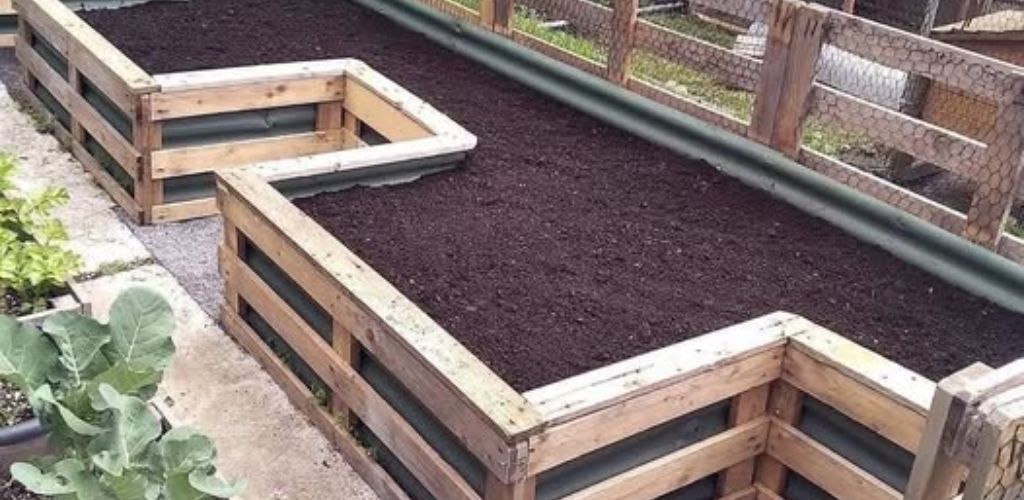
Raised beds are a modern and practical way to organize plantings on a plot. They are especially convenient on difficult soils, small garden plots, and for people who find it difficult to work bent over for long periods.

This bed allows you to create ideal conditions for plant growth , with a minimum of weeds and easy watering.
And most importantly, you can make it yourself in 1 day .
🧰 What you will need:
- 🪵 Boards, pallets or wooden boards – for the base
- 🧱 Metal profile or galvanized steel – for interior cladding (optional)
- 🔩 Screws, self-tapping screws, corners – for assembly
- 🧵 Geotextile or agrofibre – to protect the soil from erosion
- 🪨 Drainage : gravel, broken brick, expanded clay
- 🌱 Organic + fertile soil – for filling
📌 Choose a height from 30 to 50 cm, length and width as desired. The most convenient: 1.2–1.5 m wide (so that you can reach the center from any side).

🔨Step-by-step instructions:
1️⃣ Choosing a location
The best place is a sunny and open space where the soil is not over-watered.
Avoid placing it near trees: their roots will “pull” nutrients from the bed.
2️⃣ Assembling the frame
Assemble the frame from boards, pallets or timber.
✅ Treat the wood with an antiseptic, blowtorch or used oil – this will slow down the decay.
✅ It is better to connect the corners with metal corners or additional stiffeners.
3️⃣ Processing from the inside
- You can lay agrofibre or thick film – this will protect the tree from moisture from the inside.
- If your budget allows, line the inside with galvanized iron – it will last longer.
4️⃣ Rodent protection and drainage
Place a fine-mesh metal net on the bottom of the bed — this will stop moles and mice.
Put a 10–15 cm drainage layer on top : gravel, crushed stone, broken brick, coarse sand.
5️⃣ Filling the bed
Form in layers:
- The bottom layer is coarse organic matter (branches, hay, dry leaves, straw)
- The middle layer is compost, grass, semi-decomposed waste.
- Top – fertile soil or garden mixture (soil + humus + ash)
💡 The soil layer should be at least 25–30 cm thick so that the roots can develop freely.
✅ Advantages of raised beds:
- 🐞 Fewer pests (especially slugs and ants)
- 🧼 Reduces the number of weeds
- 💧 Improved drainage: the soil does not stagnate
- 🌡️ Warms up quickly – plants start growing earlier
- 👩🌾 Easy access: you can work standing or sitting
- 🍅 Suitable for tomatoes, zucchini, peppers, herbs and even strawberries
- 🪻 It looks neat and can become a decoration of the site
⚠️ Cons to be aware of:
- 🏗 It will take a lot of soil to fill it
- 🪵 Wooden walls deteriorate over time (they last on average 3-5 years)
- 💰 There are initial costs for materials
- 💦 Regular watering is required , especially in hot weather – the soil dries out faster than in a regular garden bed
💡 Useful tips:
✔ If you are building several beds at once, place them in rows with passages at least 60 cm wide
✔ You can combine materials: the bottom is made of wood, the sides are made of brick or slate
✔ In the fall, high beds can be dug up and sown with green manure (mustard, phacelia)
✔ In the spring, this soil will be the first to warm up, and you can start planting earlier than usual
✔ If you live in a dry region, consider drip irrigation in such beds
🏡 RESULT:
A raised bed is a modern approach to growing vegetables that combines aesthetics, practicality and efficiency .
It simplifies care, saves energy, improves soil structure and produces excellent harvests even in difficult areas.
📌 And most importantly, you can make it yourself and adapt it to any conditions!