Authentic Kartoshka Cake Recipe: How to Make Classic Soviet-Style Potato Pastries
If you grew up passing by vintage bakery windows, you definitely remember those iconic, dark oval treats topped with tiny decorative cream sprouts. The legendary Kartoshka cake, or “Potato pastry,” was the ultimate childhood comfort food—soft, dense, deeply aromatic, and loaded with a rich, melt-in-your-mouth flavor. While many modern commercial versions take lazy shortcuts by using stale, dry grocery store cookie crumbs, crafting this authentic treat completely from scratch transforms it into a gourmet masterpiece that tastes even better than the nostalgic originals. By baking a dedicated, airy sponge biscuit and whipping up a traditional, silky Charlotte cream, you can easily replicate that perfect texture right in your home kitchen. Gathering your family around the table to enjoy these traditional pastries is a wonderful way to share memories and treat your loved ones to a dessert made with pure ingredients. If you are also looking for clever, space-saving ways to maximize your kitchen pantry or organize your baking countertops for seamless food prep, be sure to explore our [Internal Guide to Clever Organizing Ideas and Space-Saving Tips].
The Chemistry of Charlotte Cream and the Sponge Biscuit Base
The absolute secret to achieving the authentic, velvety density of an old-school Kartoshka pastry lies in the precise balance of a custom-baked sponge cake and an egg-infused milk syrup. A classic sponge provides a delicate crumb structure that absorbs moisture uniformly without turning into a heavy, unappealing paste.
Simultaneously, the traditional Charlotte cream serves as both the premium flavor source and the structural binding agent. Unlike standard buttercream toppings, a cooked Charlotte base infuses the cake crumbs with a rich, custard-like moisture that deepens in flavor as it sets. For more professional troubleshooting advice on handling delicate doughs, mastering stovetop temperatures, and managing general domestic kitchen maintenance, read our [Internal Guide to Proper Plant Care and Household Maintenance].
- For the Custom Biscuit Base: You will need 4 large eggs, 120 grams of granulated white sugar, 100 grams of sifted all-purpose flour, and 20 grams of cornstarch (the secret to an ultra-tender crumb).
- For the Rich Charlotte Cream: Gather 75 grams of whole milk, 110 grams of white sugar, half of a whisked large egg, 125 grams of unsalted butter (completely softened to room temperature), 1 teaspoon of vanilla sugar, and 1 teaspoon of high-quality brandy or cognac (optional, for that authentic vintage aroma).
- For the Classic Outer Coating: Mix together 10 grams of premium unsweetened cocoa powder and 30 grams of finely sifted powdered sugar.
Step-by-Step Guide: Baking the Biscuit and Brewing the Custard Syrup
- Step 1: Bake the Sponge. Preheat your oven to 180°C and line a large baking sheet with quality parchment paper. In a deep bowl, beat the 4 eggs and 120 grams of sugar with a mixer on high speed until it transforms into a thick, pale, and voluminous mass. Gently fold in the sifted flour and cornstarch using a spatula to keep the air trapped inside. Pour the smooth batter onto the tray, level it out into a thin sheet, and bake for exactly 10 to 12 minutes. Allow the biscuit to dry and harden at room temperature for 10 to 12 hours, then grind it into fine, uniform crumbs using a blender.
- Step 2: Brew the Milk Syrup. In a small saucepan, combine the 75 grams of milk and 110 grams of sugar. Bring the mixture to a gentle boil over medium heat, stirring until the sugar dissolves completely. In a separate heat-safe bowl, vigorously whisk your half egg. While continuing to whisk, pour the piping hot milk syrup into the egg in a slow, ultra-thin stream to temper it without scrambling the egg. Return the entire liquid mixture back into the saucepan and cook on low heat for 1 to 2 minutes, stirring constantly until it thickens into a light custard. Remove from the stove and let it cool completely.
- Step 3: Whip the Charlotte Cream. In a clean bowl, beat the 125 grams of softened unsalted butter until it is exceptionally fluffy and white. Gradually introduce the cooled egg-and-milk custard base one single spoonful at a time, whipping continuously. Once fully incorporated, mix in the vanilla sugar and the teaspoon of aromatic brandy to finalize your rich Charlotte cream base.
Shaping the Traditional Potato Shapes, Coating, and Final Assembly
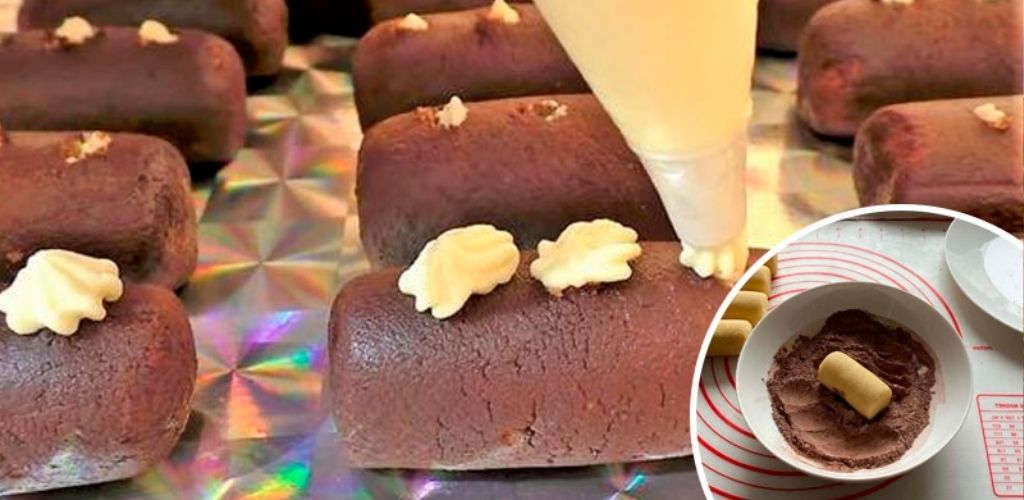
Once your components are fully prepared, reserve a small tablespoon of the white Charlotte cream in a separate piping bag to use later for the signature potato “sprouts.” Take the remaining bulk of the cream and combine it thoroughly with your prepared sponge biscuit crumbs in a large mixing bowl. Work the mixture with your hands or a heavy wooden spoon until the crumbs are completely saturated and form a cohesive, dark, and easily moldable dough.
Divide the rich pastry dough into 10 identical portions. Roll each piece between your palms to shape them into uniform, smooth oval cylinders that perfectly resemble little potatoes. In a shallow bowl, whisk together the 10 grams of cocoa powder and 30 grams of powdered sugar. Roll each shaped pastry cylinder through the cocoa mixture until it is fully and evenly coated in a dark, velvety dusting. Using the back of a wooden skewer or a clean chopstick, press 2 or 3 small indentations into the surface of each pastry, then pipe small dots of your reserved white cream into the holes to form the classic potato sprouts.
Quick Reference Matrix: Your Homemade Kartoshka Pastry Parameters
To help you seamlessly manage your time and ensure perfect texturing before you begin your dessert project, we have summarized the core mechanics of this vintage recipe into a practical overview table:
Classic Kartoshka Pastry Implementation Guide
| Preparation Stage | Primary Components Involved | Target Timing & Temp | Crucial Pastry Secret for Success |
| • Biscuit Baking | Eggs, sugar, flour, cornstarch | 180°C / 10–12 minutes | Cornstarch ensures a light, crumbly texture that grinds easily |
| • Crumb Drying | Baked sponge sheet | 10 to 12 hours rest | Drying prevents the crumbs from turning into a gummy paste |
| • Syrup Tempering | Hot milk syrup, whisked half egg | Slow pour / Cook 1–2 mins | Pour slowly while whisking to avoid cooking the egg whites |
| • Cream Whipping | Softened butter, cooled syrup base | Add custard gradually | Butter must be room temperature to prevent the cream separating |
| • Pastry Chilling | Coated and decorated cakes | Refrigerator / 2 hours minimum | Chilling allows the fats to firm up and deepens the flavors |
Slide your beautifully decorated pastries into the refrigerator and let them chill for an absolute minimum of 2 hours before serving. This cooling phase is critical because it allows the butter fats to firm back up, locking in that dense, authentic melt-in-your-mouth bite, while giving the sponge crumbs time to fully absorb the sweet vanilla and brandy aromas. The final result is an incredibly rich, nostalgic dessert that perfectly captures the magic of old-school European bakeries. Arrange them on a pretty serving platter and enjoy them alongside a piping hot cup of black tea, fresh milk, or espresso for an unforgettable trip down memory lane.