Understanding Hammer Drill Symbols: What Do the Hammer and Three Dots Mean?
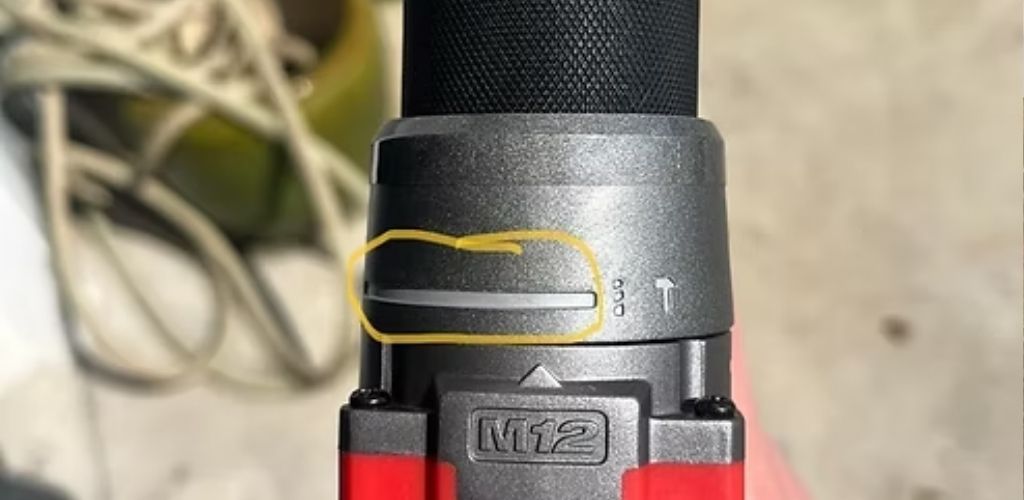
When working with power tools, understanding the various icons and settings can significantly impact your project’s success. If you have ever looked closely at a high-performance rotary hammer drill, you might have noticed a small engraved hammer symbol accompanied by three distinct dots, alongside a mysterious groove or channel in the casing. These markings are not just decorative; they serve as a vital visual guide to help you select the correct operational mode for challenging DIY tasks. Using the wrong setting can quickly dull your bits or damage your surface, making it essential to decode these industry-standard tool symbols before you begin. To learn more about selecting the right gear for your next project, explore our [Power Tool Buying Guide] right here on our website.
The prominent channel or groove found near the selector switch area of your drill serves a dual purpose depending on your tool’s specific engineering. In many heavy-duty models, this channel functions as part of an ergonomic mode-selection track, guiding the dial smoothly into position while preventing accidental shifting during high-vibration tasks. Alternatively, in compact designs, these grooves double as crucial ventilation channels designed to dissipate heat away from the internal motor and gear housing. No matter the exact layout, this channel marks the control zone where you can transform your tool from a standard rotary driver into a powerful masonry penetrator.
When you align your selector switch with the engraved hammer and the three dots, you are activating the dedicated percussion or impact drilling mode. The hammer icon clearly indicates that the tool is ready for heavy-duty pounding, while the three dots are a universal symbol used by manufacturers to represent the rapid, consecutive impacts delivered per minute (BPM). In this specific configuration, the drill mechanism combines standard rotational force with a rapid forward-and-backward hammering action. This dual-force mechanism is precisely what allows the carbide-tipped bit to pulverize tough materials efficiently without overheating.
Quick Reference: Hammer Drill Modes & Applications
| Drill Symbol | Operational Mode | Best Used For | Action Type |
| Standard Twist Icon | Rotary Only | Wood, Metal, Plastic, Drywall | Pure Rotation |
| Hammer + 3 Dots | Percussion / Impact Mode | Concrete, Brick, Stone, Mortar | Rotation + Forward Pounding |
| Chisel Icon (Rotary Hammers) | Chipping Only | Removing tiles, breaking up old concrete | Pounding Only (No Rotation) |
This impact setting is absolutely essential when you are attempting to bore holes into dense, unyielding materials like poured concrete, solid stone, or clay brick. Attempting to drill through masonry using a standard rotary mode will quickly ruin your drill bits and put unnecessary strain on the motor. By switching to the hammer-and-dots setting, the tool does the hard work for you, chipping away the substrate millisecond by millisecond as the bit rotates. If you are dealing with softer materials like wood, plastic, or drywall, remember to switch back to standard mode to prevent shattering the surface, and always check our [Masonry Drilling Tips] section for detailed project walk-throughs.
While these symbols are relatively universal across major manufacturing brands, it is always a smart habit to consult your tool’s specific user manual to see if your model features hidden sub-modes or advanced torque adjustments. Keeping the ventilation channels clear of drywall dust and lubricating the chuck regularly will ensure your tool delivers peak impact performance for years to come. If this quick guide helped you decode your power tool and saved you time on your latest home improvement project, please consider subscribing to our page, leaving us a like, and sharing this article with your fellow DIY enthusiasts and friends on social media!