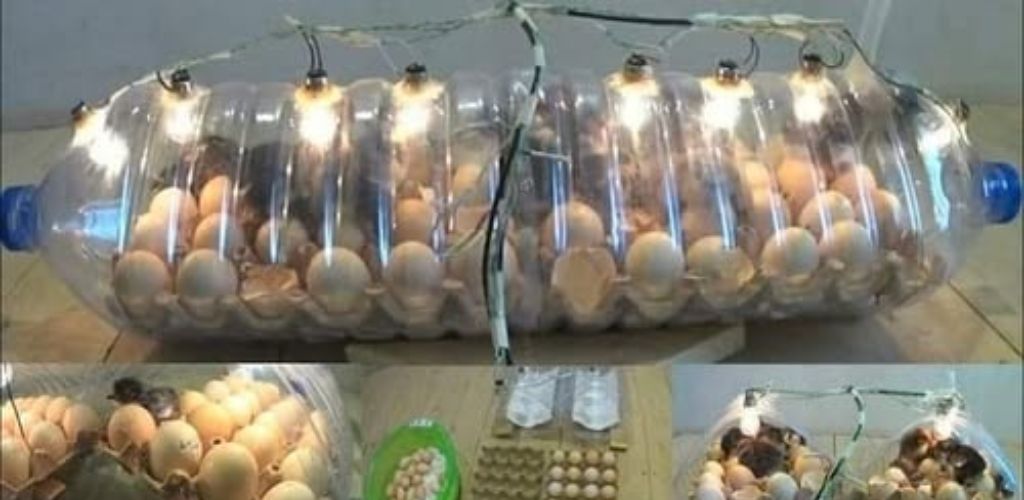
Egg incubation is a fascinating process that allows us to observe the miracle of life from a unique perspective.
Although professional incubators are designed to ensure a controlled and stable environment for embryo development, their high cost can be a barrier for many people.
Fortunately, there is a practical and economical solution: build your own homemade incubator using a simple water bottle.
This article provides a detailed guide to building a reliable and efficient homemade incubator using simple materials you likely already have at home.
Necessary materials
- A 5-liter (or larger) plastic bottle – to provide adequate space for the eggs.
- Small light bulbs or heat lamps – to generate and maintain a constant temperature inside the incubator.
- A thermometer and hygrometer – to monitor temperature and humidity, key factors for successful incubation.
- Egg carton or foam – to keep eggs stable and prevent them from rolling.
- Cutting tools (such as scissors or a drill) – to create the necessary openings for ventilation and access.
Procedure
1. Preparing the bottle
- Clean the plastic bottle thoroughly to remove any residue or substances that could affect the incubation environment.
- Lay the bottle on its side and cut a large opening in the narrower side. This opening will serve as a door for inserting and removing the eggs.
2. Setting the heat source
- Install small bulbs or heat lamps on the top or inside sides of the bottle.
- Make sure the bulbs are securely fastened and evenly distributed to provide consistent, even heating.
- The goal is to maintain an internal temperature of approximately 37.5°C (99.5°F) , as this is the ideal temperature for incubating most eggs.
- If possible, use a thermostat to automatically regulate the temperature and prevent overheating.
3. Ensure the stability of the eggs
- Place a foam base or egg carton inside the bottle to hold the eggs.
- Make sure the eggs are arranged securely and do not roll or shift around inside the incubator.
- The position of the eggs should allow adequate ventilation and access for easy turning.
4. Monitoring temperature and humidity
- Place the thermometer and hygrometer inside the incubator.
- The temperature should be kept constant at 37.5°C (99.5°F) .
- Humidity should be maintained at 45-55% for most of the incubation process.
- Adjust heat sources and vents to regulate temperature and humidity as needed.
5. Ventilation
- Make small holes in the top and sides of the bottle to allow for constant air circulation.
- Adequate ventilation is essential to prevent carbon dioxide buildup and ensure a constant supply of oxygen for developing embryos.
- If the humidity is too low or high, adjust the size or number of holes to balance the internal conditions.
6. Manually turn the eggs
- To ensure even embryo development, turn the eggs manually at least 3 times a day.
- When turning the eggs, do so with gentle movements to avoid damaging the delicate inner membranes.
- Continue turning the eggs until approximately 2 or 3 days before the expected hatching date.
- After this point, leave the eggs still to allow the chicks to position themselves correctly for hatching.
By following these steps carefully, you can create an ideal environment for egg development and increase your chances of hatching success!