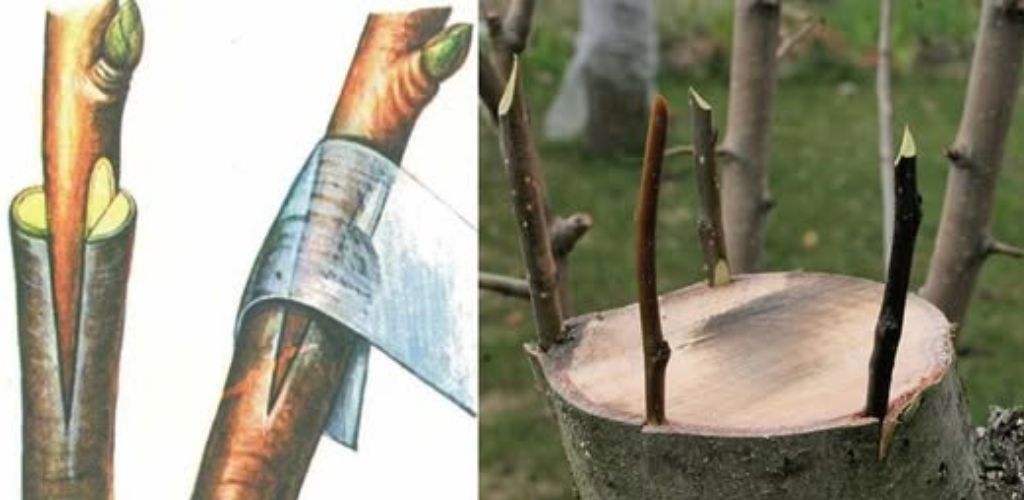
Tree grafting is an ancient technique that combines the best characteristics of different fruit trees, achieving more abundant and higher-quality production.
This method involves joining a branch or bud of a desired variety (a cutting) to a base tree (a rootstock) so that they grow as a single plant.
The process may seem complicated at first, but with the right tools and following the correct steps, any gardener can achieve successful results.
Below is a detailed guide to grafting trees using the traditional method.
Necessary materials
Before you begin the grafting process, make sure you have the following materials:
- Sharpened and disinfected gardening knife
- One-year-old shoots with 3 or 4 buds
- Plastic film, thread or electrical tape (preferably with the adhesive side facing outwards)
- Garden tar or cut sealant
- Pruning shears (optional)
Procedure
1. Preparation of the rootstock:
- Cleaning the grafting area:
Use a gardening knife to carefully clean the cut area. This will ensure a better fusion between the rootstock and the cutting, removing any dirt or dead tissue. - Making the cut:
Make a vertical cut in the bark of the rootstock approximately 4 to 6 cm long, making sure to reach the wood. - Separating the bark:
Using the back of the knife, slightly fold the bark on both sides of the cut to facilitate insertion of the cutting.
2. Preparing the cutting:
- Shoot Selection:
Choose a one-year-old shoot that has 3 or 4 well-developed buds. - Cutting the cutting:
Make a slanted cut at the base of the cutting, approximately 4 times the diameter of the cutting . This cut will allow for a better connection between the cutting and the rootstock. - Sharpening the cut:
Slightly sharpen the bottom of the cut on the opposite side to facilitate insertion and ensure better adhesion.
3. Inserting the cutting:
- Inserting the cutting into the rootstock:
Insert the cutting behind the bark of the rootstock, so that it protrudes 1 to 2 mm above the rootstock cut. - Number of cuttings:
To ensure even healing and a better success rate, it is recommended to insert between 2 and 4 cuttings on the same branch.
4. Fixing and protection:
- Tying the graft:
Secure the graft site firmly using twine, plastic wrap, or electrical tape (place the sticky side outward to prevent the graft from sticking to the fixing material). - Graft Protection:
Cover all cuts with garden pitch to prevent drying and protect the graft from infection and adverse weather conditions.
Additional tips
- Graft in early spring or late winter, when the tree is dormant but the sap is just beginning to move.
- Make sure tools are always clean and disinfected to prevent the transmission of diseases.
- If the graft doesn’t take in the first few weeks, don’t get discouraged; review the process and try again.
- Choose rootstocks compatible with the variety you want to graft to increase the chances of success.
Follow these steps and enjoy a bountiful and healthy harvest!